Category Archives: Work

UPLOAD SAML IDP fAILED – Failed to parse IDP Metadata on pALO aLTO fIREWALL

When setting up SAML IDP on Palo Alto firewall (version 10.0.6) we are importing the XML file provided by our SAML vendor.

However, when importing it we get the following error message:

Upload SAML IDP Failed
Failed to parse IDP Metadata.

The problem is that the “Profile Name” field is limited to 31 characters, but it isn’t validated by the firewall. From the validation when making a new SAML Identity Provider, only alphanumeric characters, underscore ‘_’, hyphen ‘-‘, dot ‘.’ or spaces are permitted.

If you decrease the length of the name, it will import the metadata correctly.

Deploying Palo Alto FIrewall in Azure – Maintenance Mode

I deployed a Palo Alto VM firewall into Azure recently. Every time I deployed it from the Azure template from the Marketplace or using bootstrap (which still uses the Azure template to get started) the firewall would take about 20-30 minutes and then wind up in maintenance mode without a usable IP address, and no management GUI.

Errors on the serial console were “Entry Reason: System Startup error.” and the Maintenance Entry Reason was “System start failed multiple times. Caused by service: mgmtsrvr”. I deployed the latest version of Palo Alto firewall (version 9.1.3 as of this writing).

Eventually I was able to solve the problem by trying a different password. Even though the template has the following requirements for passwords:

Our original auto generated password that broke the firewall was “wQCoPb7E7T9c5844FbbA@r5iVFQu8V2S” (no quotes). I don’t know if the @ (asterisk) symbol broke the firewall or there was a length issue, but after we changed the password the firewall deployed quickly and easily into Azure. So if you are immediately kicked into maintenance mode with your Palo Alto firewall, try a different password.

This CSR was created with an invalid algorithm – GoDaddy and ECC / ECDSA Certificates

We are working on testing the Microsoft’s Always On VPN  solution.  It is recommended to use the ECC certificates (Elliptic-curve cryptography) for performance and security reasons (256-bit ECC versus 2028 bit RSA key I’m assuming improves the performance, but I’m not sure how it is more secure).

After generating the CSR for the certificate using these instructions we pasted the CSR into GoDaddy to generate the certificate.  However after submitting the CSR we got the following error message:

“This CSR was created with an invalid algorithm”

After a call with GoDaddy Support, they confirmed that they do not currently support ECC or ECDSA or DSA keys on certificates and only support RSA keys.  If you use GoDaddy and need an ECC certificate, please give GoDaddy Support a call to ask for these keys to be supported going forward.  Hopefully enough people will contact them that they add this feature in the future.

Citrix NetScaler and Blank AGESSO.JSP Page

We have recently been locking down systems to protect from the DROWN Attack vulnerability. This process involves removing the insecure SSL protocols and SSL ciphers and has generally been straightforward.

Today when locking down a Citrix NetScaler 11.x VPX appliance with a locally installed Web Interface we kept running into the issue with the blank AGESSO.JSP file after logging into the web site. This is a reasonably common issue, with lots of solutions, none of which worked today. It was eventually narrowed down to missing the following cipher on the NetScaler Gateway Virtual Server: SSL3-DES-CBC3-SHA. With this cipher missing, the Java Web Interface running on the Citrix NetScaler appliance didn’t trust the installed NetScaler Gateway.

The output from SSL Labs showed the following differences:

Without the SSL3-DES-CBC3-SHA cipher included:

Without-SSL3-DES-CBC3-SHA

With the SSL3-DES-CBC3-SHA cipher included:

With-SSL3-DES-CBC3-SHA

So it sounds like the NetScaler Web Interface is still running Java 6.x that doesn’t trust the Access Gateway.

So my new best practice for the SSL ciphers on a NetScaler Gateway VPX (running version NetScaler Build 11.0-65.31 or later) are the following:

bind ssl cipher vpx-cipher-list
bind ssl cipher vpx-cipher-list -cipherName TLS1.2-ECDHE-RSA-AES256-GCM-SHA384
bind ssl cipher vpx-cipher-list -cipherName TLS1.2-ECDHE-RSA-AES128-GCM-SHA256
bind ssl cipher vpx-cipher-list -cipherName TLS1.2-ECDHE-RSA-AES-256-SHA384
bind ssl cipher vpx-cipher-list -cipherName TLS1.2-ECDHE-RSA-AES-128-SHA256
bind ssl cipher vpx-cipher-list -cipherName TLS1-ECDHE-RSA-AES256-SHA
bind ssl cipher vpx-cipher-list -cipherName TLS1-ECDHE-RSA-AES128-SHA
bind ssl cipher vpx-cipher-list -cipherName TLS1.2-AES256-GCM-SHA384
bind ssl cipher vpx-cipher-list -cipherName TLS1.2-AES128-GCM-SHA256
bind ssl cipher vpx-cipher-list -cipherName SSL3-DES-CBC3-SHA


Citrix XenMobile 10.3 Setup of Android for Work: Enterprise Service Account Key is not found

I’m working to setup Citrix XenMobile 10.3 with Android for Work in the office.  I’ve been working through this set of documentation from Citrix here.  After Citrix enabled their side of the configuration and it correctly shows in my Google Admin console, when I try to add the Android For Work settings to XenMobile there are number of things that are strange:

  1. There are only prompts for the Domain Name, Domain Admin Account, and Service Account ID.  There is no option for the Binding Token as shown in the screenshots.
  2. Once I enter this information I get the following error message “Enterprise Service Account Key is not found. Please check the configuration values.”

There is currently no XenMobile 10.3 specific information, so I don’t know if this is a change specific to 10.3 or a bug in 10.3.

Are you seeing this same error message?  How did you get around it?

UPDATE 1/13/2016: 

We have a case open with Citrix Support.  They are currently trying to duplicate the problem on a clean system, so hopefully I should know more later today if it is a bug with the newest version of software or something we did incorrectly with the setup.  Since the Google web pages have changed the Citrix documentation is out of date, so there might be some steps missing now that Google’s process has changed.

UPDATE 1/13/2016 4:37 PM UTC:

From Citrix Support: “We have been able to confirm the errant behavior and are currently engaged with engineering on a fix. We believe that the issue centers around the changes implemented on the Google Api site, as it does not seem to generate the service account details in the same format. I hope to have an idea by EOB if this is actually the case, or if we can come up with a workaround for the problem. Thanks!”

UPDATE 2/4/2016 11:28 PM UTC

Unfortunately I don’t have a fix that I can provide directly for this.  Based on the case we had open with Citrix support it sounds like Google’s API changed breaking this functionality.  Through a combination of additional undocumented steps and changes on the Citrix back end they were able to get this working.

Useful Tools: Notepad++ and regex to the rescue

Notepad++ is one of my favorite text editors and I tend to install it on any computer I’m working with. While the built-in Windows Notepad only gets you so far, the free GPL Licensed Notepad++ has some big advantages:

1. Can handle the large text files (think 100MB log files) with ease.

2. There is a great Compare plugin in the Plugin Manager that lets you easily compare two text files.  I use this all the time when comparing firewall or switch configurations to see what has changed (or what needs to change when doing firewall migrations to new hardware.

3. You can open up multiple text files in tabs in Notepad++ and search across all the documents at the same time.

4. It is language specific.  Open up an HTML file in Notepad++ and it knows about HTML formatting and changes the text color appropriately.  Same thing with other formats like XML, PowerShell, VBScript, etc.

Yesterday  I was asked by a colleague to parse a Cisco switch configuration to find ports that are configured differently froman example port on a switch with several hundred ports on it.  The example text would look something like the following:

interface GigabitEthernet2/0/27
switchport access vlan 232
spanning-tree portfast

interface GigabitEthernet2/0/28
description I’m different
switchport access vlan 232
spanning-tree portfast

interface GigabitEthernet2/0/29
switchport access vlan 232
spanning-tree portfast

Ideally, we’d just flag port 2/0/28 as different in the example above, since it doesn’t match the other two ports.

While a regular Find/Replace operation would find the particular lines to be deleted, it wouldn’t be able to handle the changes in the port numbers.  That’s where the regular expression (regex) feature of Notepad++ can help.  Regex is a very powerful method for handling text files but can be very confusing.

There’s a great regex testing tool here: https://regex101.com/ so you can experiment with building your own regex expressions.

Let’s go through this example:

Our main problem is that we need to search through all the ports and ignore the port numbers in the example above, so that we can find all the ports regardless of number: “interface GigabitEthernet2/0/27”.  To do this we need to search for the following:

interface GigabitEthernet\d*\/\d*\/\d*

Where the search terms are the following:

\d = any single numeric digit
* = repeat the previous token (the \d in this case from 0 to infinite times).
\/ = This is the escape character “\” followed by the forward slash character “/” which searches for a forward slash “/”

By combining those together we have a string that will search for all the ports in the configuration.  The only remaining issue now is the carriage returns in the file.  These can be found using \r for carriage return and \n for new line.  So the full search string we are looking for is now:

interface GigabitEthernet\d*\/\d*\/\d*\r\n switchport access vlan 232\r\n spanning-tree portfast\r\n

Now just do a replace in Notepad++ (make sure to choose the regular expression radio box) and replace that text with nothing so that the matching ports are removed from the text configuration.

Notepad++ Regular Expression Search showing Regular Expression Radio Box Checked
Notepad++ Regular Expression Search

Congratulations, now the only ports that should be left in the configuration are ports that are “different” and would need to be handled separately.

Do you have a favorite feature of Notepad++?  Do you have some favorite regex expressions that you use all the time?  Do you have some other favorite, must have tool that you’d like to share?  Please let me know in the comments.


Note: This article has also been published on the Kraft & Kennedy website

Redundant ISP’s – The Inbound Failover Problem Solved with DNS Made Easy

Adding second ISP to your firewall allows users in the office to access the Internet in case the primary ISP is unavailable. However, any inbound services that depend on public DNS records (typically ActiveSync, OWA, Citrix, VPN, and publicly accessible web servers) will be unavailable to remote users and clients until DNS records have been pointed to the new IP address. Kraft Kennedy has been testing DNS Made Easy, a product designed to address this quandary.

Traditionally this issue has been solved by setting up BGP (Border Gateway Protocol) routing between the ISP’s. This works because the public IP address never changes, just the path to get to the internal systems either through the primary or backup ISP. This requires the cooperation of both ISPs to support BGP (typically won’t work with business DSL or cable connections), a router/switch that supports BGP that connects to both ISPs, the purchase of an autonomous system number (ASN) from ARIN, and an expert to help configure the switch and coordinate the process with both ISP’s and configure the switch/router. Not a simple deployment, to say the least.

Less traditional were the load balancing appliances that could aggregate multiple ISP connections, providing increased bandwidth and failover. Appliances from FatPipe and F5 fit into this category. Inbound failover is handled by DNS manipulation on the public DNS server running on the appliance. The advantage of this is that it can work with any ISP and doesn’t require cooperation from the ISP to implement. The downsides of this solution can be costliness and additional network complexity in deploying the appliance.

Recently Kraft & Kennedy has implemented a third approach for inbound failover, using a hosted solution from DNS Made Easy. They host our public DNS zones on their server and manipulate DNS in case we have an ISP failure with our inbound services.

The basic process of migration to DNS Made Easy is as follows:

1. Migrate the public DNS zones from your existing public DNS provider to DNS Made Easy.

2. Identify particular DNS records to be setup for failover (e.g. Outlook Web Access).

3. Set the TTL (Time to Live) on the DNS record to 180 seconds (3 minutes).  This is how long a DNS server should cache the record before requesting an update from DNS Made Easy.

4. Enable firewall rules so that your inbound service has the required ports open on both the primary and backup ISP.

5. Setup the Monitoring and Failover rule.

DNS Made Easy Failover Record

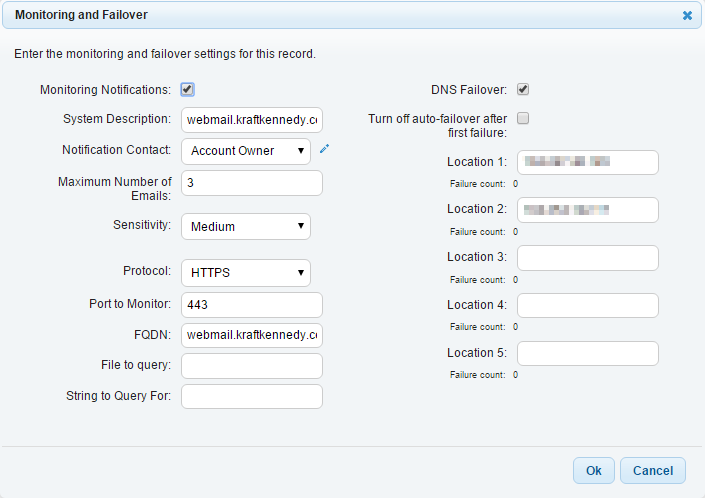
6. Monitoring Notifications: Checked

7. Notification Contact: Account Owner

8. Number of Emails: 3

9. Sensitivity: Low / Medium (Default) / High

10. Protocol: HTTP / HTTPS / TCP / UDP / DNS.  Pick the appropriate protocol depending on the service/server you are monitoring.  For OWA we are just monitoring on HTTPS protocol.

11. FQDN: The fully qualified domain name of the server being monitored (e.g. webmail.kraftkennedy.com).

12. File to Query (particular to HTTP/HTTPS monitoring): If you are looking for a particular file on the web server.

13. String to Query For (particular to HTTP/HTTPS monitoring): If you are looking for particular contents in the file received from the web server.

14. DNS Failover: Checked.  This actually does the failover if the monitoring fails.

15. Turn off auto-failover after first failure: Typically unchecked.  We want the connection to fail back to the primary ISP when it is available.

16. Location 1 -5:  This is the IP address that you’d like to use for your primary ISP (Location 1) and then any failover IP addresses should follow after this. The locations do not need to be in the same office so this can also be used to fail over between data centers.

So if we had an issue with our primary ISP, DNS Made Easy will detect this in a matter of a few minutes, realize that it is unavailable, and then switch over the DNS record to the secondary ISP. The 180 second TTL on the DNS record means that clients should receive the change in approximately 3 minutes depending on the DNS provider used. While the failover isn’t instantaneous, it will typically happen faster than manually changing DNS records and IT staff can receive an automated email alert about the failover and failback.

The typical costs for most clients of the DNS Made Easy Business account are $59.99 per year for up to 25 domains and 3 failover records. Additional failover records can be purchased for $4.95/record/year (slightly cheaper, at $45.95, for a 10 pack of failover records).

Note: This article also posted to my work blog here.


Problems registering for Apple Developer Account and D-U-N-S Name

My company is registering for an Apple Developer account to be able to deploy MDM (Mobile Device Management) solution to IOS devices.  As part of the registration process you have to get your D-U-N-S Number from D&B register the company.  However, even though the rest of the information was correct, it kept failing on the company name not matching and we couldn’t submit the application.

The company name is “Kraft & Kennedy, Inc.” and that is the name that we have registered with Dun & Bradstreet and shows up in the D-U-N-S verification form on Apple’s web site.  However, you can’t put ampersands or commas into the Apple form for the company name.   After trying multiple variants of the company name the only thing that worked was substituting the ampersand with the word “and”, so we were able to get registered with “Kraft and Kennedy Inc.” on the Apple form.

Troubleshooting SCCM Client Installation Error 0x80041002

In trying to install the SCCM 2012 client on a Windows 7 workstation  it terminated with error 0x80041002.  Here’s the log snippet from CCMSETUP.LOG:

[LOG[Failed to open to WMI namespace ‘\\.\root\cimv2’ (80041002)]LOG]!<time=”05:24:55.747+240″ date=”05-15-2015″ component=”ccmsetup” context=”” type=”3″ thread=”1300″ file=”wminamespace.cpp:305″
[LOG[CcmGetOSVersion failed with 0x80041002]LOG]!<time=”05:24:55.747+240″ date=”05-15-2015″ component=”ccmsetup” context=”” type=”2″ thread=”1300″ file=”util.cpp:1474″
[LOG[Failed to open to WMI namespace ‘\\.\root\ccm’ (80041002)]LOG]!<time=”05:24:55.750+240″ date=”05-15-2015″ component=”ccmsetup” context=”” type=”3″ thread=”2156″ file=”wminamespace.cpp:305″
[LOG[Failed to get client version for sending messages to FSP. Error 0x80041002]LOG]!<time=”05:24:55.750+240″ date=”05-15-2015″ component=”ccmsetup” context=”” type=”2″ thread=”2156″ file=”ccmsetup.cpp:9838″
[LOG[Params to send FSP message ‘5.0.7958.1000 Deployment Error 0x80041002 : ‘]LOG]!<time=”05:24:55.750+240″ date=”05-15-2015″ component=”ccmsetup” context=”” type=”0″ thread=”2156″ file=”ccmsetup.cpp:9887″
[LOG[Failed to open to WMI namespace ‘\\.\root\ccm’ (80041002)]LOG]!<time=”05:24:55.753+240″ date=”05-15-2015″ component=”FSPStateMessage” context=”” type=”3″ thread=”2156″ file=”wminamespace.cpp:305″
[LOG[State message with TopicType 800 and TopicId {A1967584-10FA-45E0-8790-1559DEF627B5} has been sent to the FSP]LOG]!<time=”05:24:55.760+240″ date=”05-15-2015″ component=”FSPStateMessage” context=”” type=”1″ thread=”2156″ file=”fsputillib.cpp:752″
[LOG[CcmSetup failed with error code 0x80041002]LOG]!<time=”05:24:56.180+240″ date=”05-15-2015″ component=”ccmsetup” context=”” type=”1″ thread=”2156″ file=”ccmsetup.cpp:10879″

It turned out that WMI on this workstation was completely unusable.  When using the WBEMTEST application you couldn’t even connect to the WMI at all.

With the help of the WMI: Rebuilding the WMI Repository article I was able to rebuild WMI on this workstation using the following commands:

Winmgmt /verifyrepository

Winmgmt /salvagerepository

Once WBEMTEST connected successfully the SCCM Client correctly installed.

Cisco ASA Firewall Presents Only “ASA Temporary Self Signed Certificate”

Recently we started to get reports of untrusted certificates for AnyConnect and when accessing the ASDM web page. When you browse to the web site it was presenting the default “ASA Temporary Self Signed Certificate” rather than our public SSL certificate.

After opening a case with Cisco TAC about this they pointed us to the release notes issue in ASA 9.4(x):

Elliptic curve cryptography for SSL/TLS—When an elliptic curve-capable SSL VPN client connects to the ASA, the elliptic curve cipher suite will be negotiated, and the ASA will present the SSL VPN client with an elliptic curve certificate, even when the corresponding interface has been configured with an RSA-based trustpoint. To avoid having the ASA present a self-signed SSL certificate, the administrator needs to remove the corresponding cipher suites using the ssl cipher command. For example, for an interface configured with an RSA trustpoint, the administrator can execute the following command so that only RSA based ciphers are negotiated:

ssl cipher tlsv1.2 custom
“AES256-SHA:AES128-SHA:DHE-RSA-AES256-SHA:DHE-RSA-AES128-SHA:DES-CBC3-SHA:DES-CBC-SHA:RC4-SHA:RC4-MD5”

As soon as I added the command into our ASA it started working again. It sounds like this should be a default entry going forward for all ASA firewalls.

Want to learn more about elliptic curve cryptography  or look at this for a primer.