Tag Archives: SCCM

Troubleshooting SCCM Client Installation Error 0x80041002

In trying to install the SCCM 2012 client on a Windows 7 workstation  it terminated with error 0x80041002.  Here’s the log snippet from CCMSETUP.LOG:

[LOG[Failed to open to WMI namespace ‘\\.\root\cimv2’ (80041002)]LOG]!<time=”05:24:55.747+240″ date=”05-15-2015″ component=”ccmsetup” context=”” type=”3″ thread=”1300″ file=”wminamespace.cpp:305″
[LOG[CcmGetOSVersion failed with 0x80041002]LOG]!<time=”05:24:55.747+240″ date=”05-15-2015″ component=”ccmsetup” context=”” type=”2″ thread=”1300″ file=”util.cpp:1474″
[LOG[Failed to open to WMI namespace ‘\\.\root\ccm’ (80041002)]LOG]!<time=”05:24:55.750+240″ date=”05-15-2015″ component=”ccmsetup” context=”” type=”3″ thread=”2156″ file=”wminamespace.cpp:305″
[LOG[Failed to get client version for sending messages to FSP. Error 0x80041002]LOG]!<time=”05:24:55.750+240″ date=”05-15-2015″ component=”ccmsetup” context=”” type=”2″ thread=”2156″ file=”ccmsetup.cpp:9838″
[LOG[Params to send FSP message ‘5.0.7958.1000 Deployment Error 0x80041002 : ‘]LOG]!<time=”05:24:55.750+240″ date=”05-15-2015″ component=”ccmsetup” context=”” type=”0″ thread=”2156″ file=”ccmsetup.cpp:9887″
[LOG[Failed to open to WMI namespace ‘\\.\root\ccm’ (80041002)]LOG]!<time=”05:24:55.753+240″ date=”05-15-2015″ component=”FSPStateMessage” context=”” type=”3″ thread=”2156″ file=”wminamespace.cpp:305″
[LOG[State message with TopicType 800 and TopicId {A1967584-10FA-45E0-8790-1559DEF627B5} has been sent to the FSP]LOG]!<time=”05:24:55.760+240″ date=”05-15-2015″ component=”FSPStateMessage” context=”” type=”1″ thread=”2156″ file=”fsputillib.cpp:752″
[LOG[CcmSetup failed with error code 0x80041002]LOG]!<time=”05:24:56.180+240″ date=”05-15-2015″ component=”ccmsetup” context=”” type=”1″ thread=”2156″ file=”ccmsetup.cpp:10879″

It turned out that WMI on this workstation was completely unusable.  When using the WBEMTEST application you couldn’t even connect to the WMI at all.

With the help of the WMI: Rebuilding the WMI Repository article I was able to rebuild WMI on this workstation using the following commands:

Winmgmt /verifyrepository

Winmgmt /salvagerepository

Once WBEMTEST connected successfully the SCCM Client correctly installed.
SCCM BITS Distribution Point on Windows Server 2008 R2 SP1 Troubleshooting

I recently deployed Microsoft System Center Configuration Manager (SCCM) 2007 R3 for a client on a newly built Windows Server 2008 R2 with SP1.

Everything worked well and I was able to image and deploy applications to the workstations without an issue until trying to deploy an older version of Elite Enterprise.  The installation would start, but stay at 0% complete for hours and never actually download.  There were no error messages on the client workstation indicating there was a problem.

I had already updated the c:\windows\system32\inetsrv\config\applicationHost.config file to remove references to excluded file extensions under the <requestFiltering> section which has been mentioned elsewhere as causing problems during a BITS transfer.

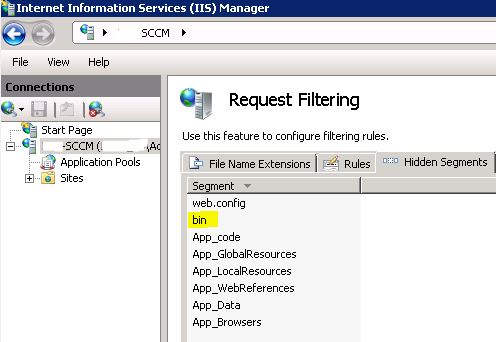
In digging into the IIS logs further showed some files getting stuck with a 404.8 (Hidden Namespace) error message, again a known issue that has been fixed in the applicationHost.config file by modifying the <hiddenSegments> section of the file.  In this case there was a /bin/ directory that was included in the Elite Enterprise installation that was getting stuck.

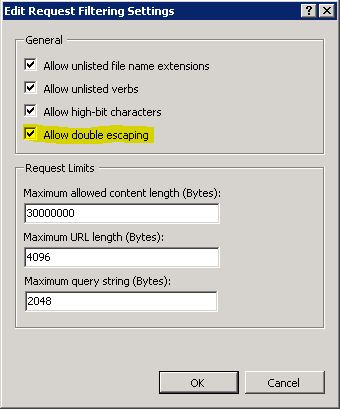
I also saw the occasional 404.11 (URL Double Escaped) error message in the log that again has been covered elsewhere and fixed in the applicationHost.config file by modifying the <requestFiltering> section of the log.

Eventually I gave up trying to modify the file and went to look in the Internet Information Services (IIS) Manager.  By going into the Request Filtering feature under my IIS server (or under the individual Site if you want to be more restrictive) I was able to remove the “bin” segment from Hidden Segments to resolve the 404.8 errors:

IIS Hidden Segment

And also right click in the empty space in the background of the right pane to choose “Edit Features” and turn on the “Allow double escaping” feature to resolve the 404.11 errors:

IIS Allow Double Escaping

Once these changes were made via the GUI I was able to go back to the workstation and quickly deploy the stuck application.  So sometimes, when it doubt, go back to the GUI.

Note: This article also posted to my work blog here.

Deploying BIOS updates during SCCM Task Sequence or Advertised Program

As part of a desktop deployment project it is always a good time to make sure that all workstations have been updated to a consistent BIOS revision level to make sure any problems are not related to BIOS inconsistencies between workstations.

First you need to download the required BIOS update from your hardware vendor and create a normal SCCM Package and Program for it.  For most recent Dell hardware the typical command line to deploy the BIOS update silently and without rebooting looks like this for a Dell Latitude E6420 laptop:

“E6420A02.exe” -NOPAUSE -NOREBOOT

Then once the Package and Program are built you can create a new step in your Task Sequence that installs a the Package (just like any other software Package).  First, make a folder that limits the new BIOS software to only run on the correct model type using a WMI query (this process is not covered in this post).   With the folder limited to a particular model type it isn’t necessary to limit each installation to a particular model type, but only to the particular BIOS version.  The folder and package steps should look like this in the Task Sequence:

Task Sequence Folder

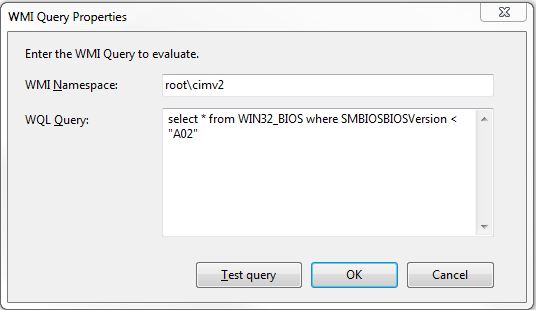
Once the installation package has been created in the task sequence and named appropriately, click on the Options tab and click the “Add Condition” button and choose “Query WMI”.

Make sure your WMI Namespace is:

root\cimv2

Then paste the following in your WQL Query:

select * from WIN32_BIOS where SMBIOSBIOSVersion < “A02″

SCCM WMI BIOS Query

This will run this Task Sequence step on all Dell Latitude E6420 laptops (based on the WMI query set at the folder level) that have a BIOS version less than A02, and will skip this step for all computers that have already been upgraded to version A02 or above.

Remember to also add a “Restart Computer” step afterwards to apply the new BIOS to the workstation.

While the above steps will cover any computers that are being reimaged, computers on the floor may still be running older versions of the BIOS.   To update the computer BIOS after initial deployment you need to create a new SCCM Collection.  Again, I already have Collections created in SCCM that limits by Model type (not covered by this post), so this new Collection is built using the parent collection using the “Limit to collection” setting:

SCCM Collection Limited to Parent

Then under the “Edit Query Statement” click the “Show Query Language” and paste in the following WQL query:

select SMS_R_SYSTEM.ResourceID,SMS_R_SYSTEM.ResourceType,SMS_R_SYSTEM.Name,SMS_R_SYSTEM.SMSUniqueIdentifier,SMS_R_SYSTEM.ResourceDomainORWorkgroup,SMS_R_SYSTEM.Client from SMS_R_System inner join SMS_G_System_PC_BIOS on SMS_G_System_PC_BIOS.ResourceID = SMS_R_System.ResourceId where SMS_G_System_PC_BIOS.SMBIOSBIOSVersion < “A02″

Click OK to get back to the Configuration Manager Console and then go Advertise the BIOS program you previously created to this new Collection.  Now only users on a Dell Latitude E6420 without the A02 BIOS installed on their workstation will be able to run this update now, helping to keep all your workstations up to date.

Note: This article also posted to my work blog here.

Problems with Silent Installation / Upgrade of Dell ControlPoint System Manager A16 Update

I was trying to update the Dell ControlPoint System Manager update from A15 to A16 on my Dell Latitude E6410 laptop today via a package created in SCCM.  However, in trying to use the silent installation command:

msiexec.exe /i dellsysmgr.msi REBOOT=ReallySuppress /qn /l*v %TEMP%\DellSysMgr.log

The installation continued to fail.  When running it non-silently I’m getting the following prompt:

—————————

Question
—————————
This will update the System Manager software present on your system. Note: This version will no longer integrate into the Dell ControlPoint launcher. Continue?
—————————
Yes   No
—————————

So far I’ve tried the following command line Properties without success based on an .MST capture to compare the MST to the original MSI file:

ISCHECKFORPRODUCTUPDATES=0

UPGRADE_REMOVE_DCPFRMWRK=1

ISACTIONPROP1={4DEF2722-7EB8-4C5F-8F0A-0295A310002A}

SYSCAP.LLP=1 or 0

SYSCAP.PORTABLE=1 or 0

LAUNCHREADME=1 or 0

InstalledSysMgrVersion=1.4.00001

Eventually I just gave up and used the old standby approach of uninstalling the old version before installing the new version with the following command line:

MsiExec.exe /X{4DEF2722-7EB8-4C5F-8F0A-0295A310002A} /QN REBOOT=ReallySuppress

Anyone else have a more elegant solution to this problem?

Disable Client Popup Message for SCCM Task Sequences

By default an advertised Task Sequence in SCCM (Microsoft System Center Configuration Manager) will popup a message on the client workstation indicating that there is a new application that is available to be run. This is sometimes not desirable. By default it is possible to turn off notification for a regular Software Distribution Program in SCCM via the GUI by checking the box on the Program for “Suppress Program Notifications”. This GUI option is not available from a Task Sequence, but can manually be added via VBScript.

The value that we are adding to the ProgramFlags setting is 0x00000400 (which in decimal is 1024). You can find more details about the ProgramFlags from here.

Here’s the basic process:

1. Copy the following script to your SCCM server and save as “DisableTaskSequencePopupMessage.vbs”

‘Disable the popup message on a client workstation for a Task Sequence
‘Run this VBScript on your SCCM server
strSMSServer = “.”
‘Set COUNTDOWN value to 0x00000400 in HEX
COUNTDOWN = &H00000400

Set objLocator = CreateObject(“WbemScripting.SWbemLocator”)
Set objSCCM = objLocator.ConnectServer(strSMSServer, “root\sms”)
Set Providers = objSCCM.ExecQuery(“SELECT * From SMS_ProviderLocation WHERE ProviderForLocalSite = true”)
For Each Provider in Providers
If Provider.ProviderForLocalSite = True Then
Set objSCCM = objLocator.ConnectServer(Provider.Machine, “root\sms\site_” & Provider.SiteCode)
End If
Next
Set TaskSequencePackage = objSCCM.ExecQuery(“SELECT * FROM SMS_TaskSequencePackage”,,48)
For Each PackageID in TaskSequencePackage
PackageIDS = PackageIDS & VbCrLF & PackageID.PackageID & ” – ” & PackageID.Name
Next
Do
strTSID = InputBox(“Please enter the packageID that corresponds to your Task Sequence:” & vbCrLF & PackageIDS)
If strTSID = “” Then WScript.Quit ‘Detect Cancel
If strTSID <> “” Then Exit Do ‘Detect value strTSID.
‘MsgBox “You must enter a numeric value.”, 48, “Invalid Entry”
Loop
Set objProgram = objSCCM.Get(“SMS_TaskSequencePackage.PackageID='” & strTSID & “‘”)

OldProgramFlags = objProgram.ProgramFlags
ProgramFlags = objProgram.ProgramFlags
ProgramFlags = ProgramFlags OR COUNTDOWN
MsgBox “Flag for ” & strTSID & ” currently set to ” & OldProgramFlags & ” (HEX: 0x” & HEX(OldProgramFlags) & “)” & vbCrLF & vbCrLF & “Adding 0x00000400 (COUNTDOWN. The countdown dialog is not displayed)” & VBCrLF & vbCrLF & “Set flag to: ” & ProgramFlags & ” (HEX: 0x” & HEX(ProgramFlags) & “)”,,”SUCCESS!”
‘ see ConfigMgr SDK for details (“SMS_Program Server WMI Class”)
objProgram.ProgramFlags = ProgramFlags
objProgram.Put_

2. Run the VBscript. You’ll be prompted with a list of the Task Sequences. Type in the name of the task sequence you want to change (e.g. NYC000279) and hit OK.

3. You should see a response like the following:

—————————
SUCCESS!
—————————
Flag for NYC00279 currently set to 152084496 (HEX: 0x910A010)

Adding 0x00000400 (COUNTDOWN. The countdown dialog is not displayed)

Set flag to: 152085520 (HEX: 0x910A410)
—————————
OK
—————————

4. Then advertise the Task Sequence and the Task Sequence will not popup any messages on the client workstation.

5. NOTE: This version is improved in that it prompts you for the task sequence ID and also now “OR’s” the value together rather than just blindly adding 1024 to the value every time the script runs, so you can safely run this script multiple times without any issues on the same Task Sequence.

References:

Workaround to disable notification for task sequence?
Notifications for virtual packages