Category Archives: Work

Microsoft Intune and Conditional Access to Exchange On-Premise Configuration Problems

I’m trying to setup the Microsoft Intune MDM solution with the Conditional Access policies to our Exchange On-Premise server.  The idea behind this is that users must enroll their device with Intune via the Company Portal app on their mobile device and then once they meet the requirements, they will be granted access to Exchange ActiveSync.

The basic setup is straightforward and easy to setup following this Technet article.  However we have run into two issues:

I received emails previously (last week) from the Intune Exchange Connector that looked like the following:

To access your organization’s email, you must enroll your device and make sure that it complies with your organization’s security policies. Follow the steps below for the relevant device.

Instructions for your Android with ID androidxxxxxxxxxxxxx
1. If you haven’t enrolled your device yet, enroll it now
2. After a couple of minutes activate your email
3. Check to see if your device is compliant

But after upgrading the latest version of the Microsoft Intune On-Premises Connect for On-Premises Exchange, I’m no longer receiving these emails but other users are.

The other issue is that the “activate your email” link doesn’t work.  The URL points to the following web site: https://enterpriseregistration.windows.net/manage/, but also includes options to POST the following:

Kraft&Kennedy,Inc.?.onmicrosoft.comeasactivation?easid=”androidxxxxxxxxxxxx&traceid=xxxxxxxxx-xxxxx-xxxx-xxxx-xxxxxxxxxxxx"”

And the response to this URL and POST commands just looks like the following:

{“Message”:”No API matching request was found, verify URL and parameters are correct”,”TraceId”:”90baac77-3ac9-43e6-bb67-3b47a6c3726f”,”Time”:”04-28-2015 11:37:57Z”}

And the TraceId above has nothing to do with the obfuscated TraceId above.

I have opened a case with Microsoft Online Support about this and will update once I get more information.
Cisco ASA Firewall ASDM Incompatibility with Java 7 Update 51

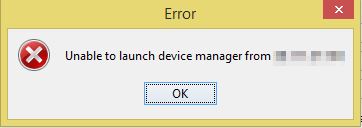
The latest version of Java 7 Update 51 that was deployed this week breaks access to Cisco ASA firewalls running ASDM.  When you connect with the ASDM you get the following error message: “Unable to launch device manager from X.X.X.X”

Unable to Launch Device Manager
“Unable to launch device manager from”

The symptoms are that the web page for the firewall will show up and display normally, but you can’t connect to the server with the ASDM launcher.  The log on the firewall shows

%ASA-6-302013: Built inbound TCP connection 112 for outside:X.X.X.X/64508 (X.X.X.X/64508) to identity:Y.Y.Y.Y/443 (Y.Y.Y.Y/443)
%ASA-6-725001: Starting SSL handshake with client outside:X.X.X.X/64508 for TLSv1 session.
%ASA-7-725010: Device supports the following 6 cipher(s).
%ASA-7-725011: Cipher[1] : RC4-SHA
%ASA-7-725011: Cipher[2] : DHE-RSA-AES128-SHA
%ASA-7-725011: Cipher[3] : DHE-RSA-AES256-SHA
%ASA-7-725011: Cipher[4] : AES128-SHA
%ASA-7-725011: Cipher[5] : AES256-SHA
%ASA-7-725011: Cipher[6] : DES-CBC3-SHA
%ASA-7-725008: SSL client outside:X.X.X.X/64508 proposes the following 8 cipher(s).
%ASA-7-725011: Cipher[1] : AES128-SHA
%ASA-7-725011: Cipher[2] : DHE-RSA-AES128-SHA
%ASA-7-725011: Cipher[3] : DHE-DSS-AES128-SHA
%ASA-7-725011: Cipher[4] : RC4-SHA
%ASA-7-725011: Cipher[5] : DES-CBC3-SHA
%ASA-7-725011: Cipher[6] : EDH-RSA-DES-CBC3-SHA
%ASA-7-725011: Cipher[7] : EDH-DSS-DES-CBC3-SHA
%ASA-7-725011: Cipher[8] : RC4-MD5
%ASA-7-725012: Device chooses cipher : RC4-SHA for the SSL session with client outside:X.X.X.X/64508
%ASA-7-725014: SSL lib error. Function: SSL3_READ_BYTES Reason: sslv3 alert certificate unknown
%ASA-6-725006: Device failed SSL handshake with client outside:X.X.X.X/64508
%ASA-6-302014: Teardown TCP connection 112 for outside:X.X.X.X/64508 to identity:Y.Y.Y.Y/443 duration 0:00:00 bytes 580 TCP Reset by appliance

Cisco has included this information in their latest release notes:

If you use Java 7 Update 51, you must upgrade ASDM to Version 7.1(5.100) or later, and you can only use the Java web start. The ASDM Launcher is not supported.

So the alternatives are to downgrade your Java on your workstation or upgrade to the latest ASDM version at this point to get the ASDM working again.

Slow TFTP Transfers to Cisco 3850 Switch

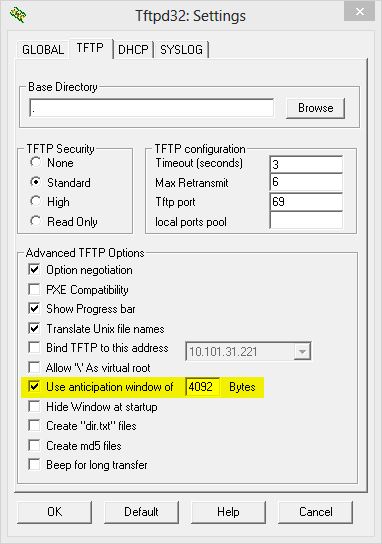
I recently upgraded a couple of Cisco 3850 switches and noticed that the TFTP transfer rate to get the Cisco IOS files to the switch were horrible (approximately 200Kbps) which took a LONG time to transfer the 250MB file required for these switches.  After trying a couple different TFTP clients, and finding nothing that worked, I dug into the settings on my preferred TFTPD32 software and found that changing the TFTP setting for “Use anticipation window of” to 4092 gave me about a 4x to 5x improvement in transfer speed.  Still slower than I would have liked but definitely tolerable now.

TFTPD32 Settings showing "Use Anticipation Window"

Sending Email from WordPress Hosted by GoDaddy

If you have just signed up for a newer GoDaddy hosting account (using either cPanel (Linux) or Plesk (Windows)) for a domain that hosts email externally from GoDaddy account you may have problems sending email.

I noticed this problem when trying to send email to new WordPress users (installed via GoDaddy) that I just created and they never got the introductory email from the server.

Mail sent from your web hosting account will be blackholed and never sent out to the external account.  You can confirm this problem by going into cPanel (sorry I don’t know what this looks like in Plesk) and use the Email Trace feature.  Just click Run Report (you don’t need any email address in the list) and look for recently sent email.  The message will show up as “Message Accepted”

GoDaddy Email Trace with Message Accepted

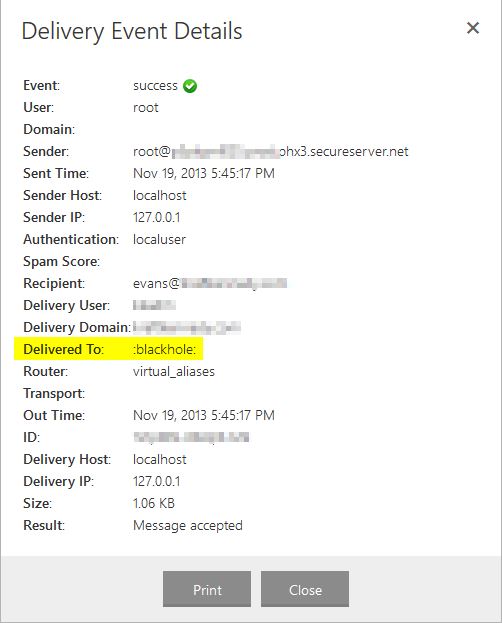
But click on the magnifying glass and the Delivery Event Details will show that this message is delivered to the :blackhole: address.GoDaddy Delivery Event Details showing "Delivered To: :blackhole:"

After an almost two hour phone call with GoDaddy support, their support person was able to contact a back end engineer who “changed something” on our account so that GoDaddy was no longer authoritative for email for our hosting domain and mail correctly started to flow out to the Internet.  I wasn’t able to get GoDaddy Support to clarify exactly what was changed on the back end but it is apparently a new “feature” of the newer hosting platform that hasn’t been reported previously.  There is currently no way to change this through the existing cPanel interface.

So please give your GoDaddy Support a call if you are running into this problem and push for them to escalate to the back end support as soon as possible.

Lync 2010 to Lync 2013 Migration: Issue with Dial-in Conferencing and SIP Trunk with REFER

We are in the middle of a migration from Lync 2010 to Lync 2013.  The migration has been very smooth and we moved several users over to the Lync 2013 environment for pilot.  Shortly after migrating the users, we identified issues with our Dial-In Conferencing.  Anyone on Lync 2013 that created a conference could not dial into the conference.  Users would call in, be prompted to input the meeting number and then would receive a busy signal. If the user moved back to the Lync 2010 pool, Dial-In Conferencing would work again.

During this process, we didn’t move our SIP trunk from the Lync 2010 Mediation Server at all, so I wasn’t sure why there should be any difference in this case.  After running a trace on our Lync 2010 Mediation Server we found the following Messages during a Dial-In Conferencing test hosted by a Lync 2013 user:

SIP/2.0 405 Method Not Allowed
Trace from Lync 2010 Mediation Server

The REFER method error indicated that it wanted to transfer the call from the Lync 2010 Mediation server to itself, which didn’t seem to implicate the new Lync 2013 environment.  After checking in with tech support at our SIP trunk provider they reminded us that the REFER method must be turned off for their SIP trunks.  In looking at the Lync 2010 Control Panel, the REFER method support is just a check box for “Enable refer support”:

Lync 2010 Control Panel  "Enable Refer Support"
Lync 2010 Control Panel “Enable Refer Support”

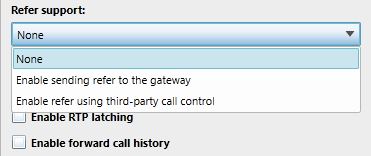
But in Lync 2013 Control Panel this has been moved to a drop down list and this feature hasn’t been duplicated to match the Lync 2010 environment:

Lync 2013 Refer Support

So the default setting in Lync 2013 turns REFER method support back on and sets it to “Enable sending refer to the gateway”.

Just set the Lync 2013 REFER method support to “None” and save the settings to match the Lync 2010 environment.  Once the change was made, the Dial-In Conferencing started working again for our Lync 2013 users and the migration could continue.


SCCM BITS Distribution Point on Windows Server 2008 R2 SP1 Troubleshooting

I recently deployed Microsoft System Center Configuration Manager (SCCM) 2007 R3 for a client on a newly built Windows Server 2008 R2 with SP1.

Everything worked well and I was able to image and deploy applications to the workstations without an issue until trying to deploy an older version of Elite Enterprise.  The installation would start, but stay at 0% complete for hours and never actually download.  There were no error messages on the client workstation indicating there was a problem.

I had already updated the c:\windows\system32\inetsrv\config\applicationHost.config file to remove references to excluded file extensions under the <requestFiltering> section which has been mentioned elsewhere as causing problems during a BITS transfer.

In digging into the IIS logs further showed some files getting stuck with a 404.8 (Hidden Namespace) error message, again a known issue that has been fixed in the applicationHost.config file by modifying the <hiddenSegments> section of the file.  In this case there was a /bin/ directory that was included in the Elite Enterprise installation that was getting stuck.

I also saw the occasional 404.11 (URL Double Escaped) error message in the log that again has been covered elsewhere and fixed in the applicationHost.config file by modifying the <requestFiltering> section of the log.

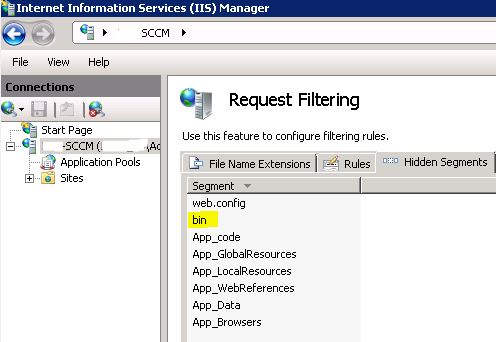
Eventually I gave up trying to modify the file and went to look in the Internet Information Services (IIS) Manager.  By going into the Request Filtering feature under my IIS server (or under the individual Site if you want to be more restrictive) I was able to remove the “bin” segment from Hidden Segments to resolve the 404.8 errors:

IIS Hidden Segment

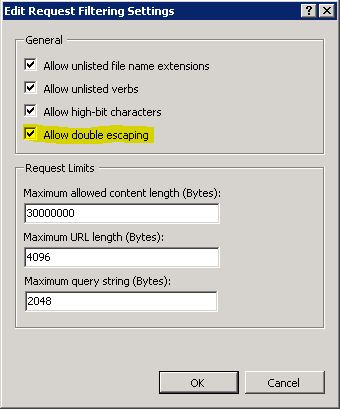
And also right click in the empty space in the background of the right pane to choose “Edit Features” and turn on the “Allow double escaping” feature to resolve the 404.11 errors:

IIS Allow Double Escaping

Once these changes were made via the GUI I was able to go back to the workstation and quickly deploy the stuck application.  So sometimes, when it doubt, go back to the GUI.

Note: This article also posted to my work blog here.

Deploying BIOS updates during SCCM Task Sequence or Advertised Program

As part of a desktop deployment project it is always a good time to make sure that all workstations have been updated to a consistent BIOS revision level to make sure any problems are not related to BIOS inconsistencies between workstations.

First you need to download the required BIOS update from your hardware vendor and create a normal SCCM Package and Program for it.  For most recent Dell hardware the typical command line to deploy the BIOS update silently and without rebooting looks like this for a Dell Latitude E6420 laptop:

“E6420A02.exe” -NOPAUSE -NOREBOOT

Then once the Package and Program are built you can create a new step in your Task Sequence that installs a the Package (just like any other software Package).  First, make a folder that limits the new BIOS software to only run on the correct model type using a WMI query (this process is not covered in this post).   With the folder limited to a particular model type it isn’t necessary to limit each installation to a particular model type, but only to the particular BIOS version.  The folder and package steps should look like this in the Task Sequence:

Task Sequence Folder

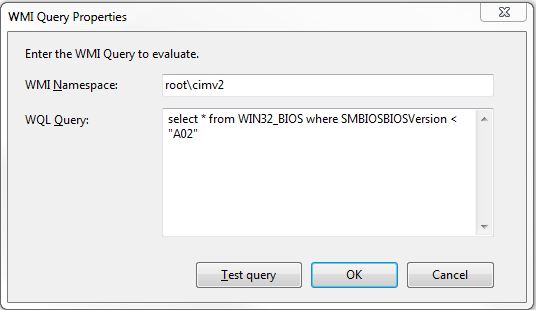
Once the installation package has been created in the task sequence and named appropriately, click on the Options tab and click the “Add Condition” button and choose “Query WMI”.

Make sure your WMI Namespace is:

root\cimv2

Then paste the following in your WQL Query:

select * from WIN32_BIOS where SMBIOSBIOSVersion < “A02″

SCCM WMI BIOS Query

This will run this Task Sequence step on all Dell Latitude E6420 laptops (based on the WMI query set at the folder level) that have a BIOS version less than A02, and will skip this step for all computers that have already been upgraded to version A02 or above.

Remember to also add a “Restart Computer” step afterwards to apply the new BIOS to the workstation.

While the above steps will cover any computers that are being reimaged, computers on the floor may still be running older versions of the BIOS.   To update the computer BIOS after initial deployment you need to create a new SCCM Collection.  Again, I already have Collections created in SCCM that limits by Model type (not covered by this post), so this new Collection is built using the parent collection using the “Limit to collection” setting:

SCCM Collection Limited to Parent

Then under the “Edit Query Statement” click the “Show Query Language” and paste in the following WQL query:

select SMS_R_SYSTEM.ResourceID,SMS_R_SYSTEM.ResourceType,SMS_R_SYSTEM.Name,SMS_R_SYSTEM.SMSUniqueIdentifier,SMS_R_SYSTEM.ResourceDomainORWorkgroup,SMS_R_SYSTEM.Client from SMS_R_System inner join SMS_G_System_PC_BIOS on SMS_G_System_PC_BIOS.ResourceID = SMS_R_System.ResourceId where SMS_G_System_PC_BIOS.SMBIOSBIOSVersion < “A02″

Click OK to get back to the Configuration Manager Console and then go Advertise the BIOS program you previously created to this new Collection.  Now only users on a Dell Latitude E6420 without the A02 BIOS installed on their workstation will be able to run this update now, helping to keep all your workstations up to date.

Note: This article also posted to my work blog here.

“Error applying transforms” during Citrix XenApp HotFix Installation

During a recent troubleshooting session with a Citrix XenApp 5 server, I wanted to make sure that the server included the recommended hotfixes.  But when trying to run the downloaded .MSP file the following error was displayed:


Windows Installer Error applying transforms. Verify that the specified transform paths are valid.

Windows Installer Error applying transforms. Verify that the specified transform paths are valid.

This happened over and over with every hotfix downloaded.  This server had originally been deployed via System Center Configuration Manager 2007 (SCCM 2007) and I was wondering if the installation cache files had been removed and needed to be downloaded from the distribution point again.  The files were correctly in place, but the hotfix wouldn’t run.

Eventually I bypassed the transform file completely by temporarily renaming the “Transforms” value under the following key to “Transforms.old”:

HKEY_CLASSES_ROOT\Installer\Products\AD9C782BBE7D2D54AB21D40174D9444F

After that was renamed I was able to successfully install the hotfix, restart and rename the registry key back to the original value.

Note: This article also posted to my work blog here.

Resolve Error 012 when synchronizing Active Directory to Microsoft BPOS

I recently started implementing Microsoft BPOS (Business Productivity Online Suite) to take advantage of the Office Live Meeting accounts for internal use.  One of the first steps in the process was to setup the Directory Sync to synchronize our on premise Active Directory domain with the Microsoft Online Services directory.   The instructions for that process are very straight forward and easy to follow using the online web pages.

Shortly after the synchronization process started we started to receive the following error messages:

Error 012: Unable to update this object in Microsoft Online Services because the proxy address associated with this object in the local Active Directory is already associated with another object. Fix this in your local Active Directory.

This was happening with a number of the distribution groups associated with our Cisco Unity implementation like unaddressedmessages@kkl.com and unaddressedmessages@kraftkennedy.com.   After searching through our domain for identical ProxyAddresses (there weren’t any), it was time to bring Microsoft Online Service Tech Support in to troubleshoot the problem.

A knowledgeable support engineer answered the phone and we started looking into the normal solutions to this problem which have already been covered elsewhere.    We eventually narrowed down the problem to the length of the SMTP email addresses.  It appears that something in the Directory Sync process only looks at the first 20 characters of an email address (at least for the distribution groups that we were synchronizing).   For example, the email addresses were unaddressedmessages@kkl.com and unaddressedmessages@kraftkennedy.com, so both of these email addresses appeared to be identical in the first 20 characters “unaddressedmessages@” as far as Directory Sync is concerned.  Not until we turned off the RUS for these email addresses and removed the duplicates in the first 20 characters of the email addresses did the Error 012 error messages go away.

Also during our testing we were seeing some issues with similar duplication in the Display Name as well, so if you are continuing to get Error 012 messages you may also want to make sure the Display Name is unique in the first 20 characters.

Unfortunately the Microsoft Support Engineer wasn’t able to confirm that Directory Sync and BPOS actually worked this way, but hopefully this will help you resolve your own Error 012 messages going forward.

Note: This blog article also posted on my work blog here.

Problem adding NIC to Broadcom Team after installation of Symantec Endpoint Protection

We had a Dell Server with a Broadcom team of NIC’s running Microsoft Windows Server 2008 R2.  The motherboard died and was replaced with a new one and got new NIC’s that we needed to add to the team.  Every time we tried to add the NIC to the existing team we got the following error message:

[0006] Broadcom BCM5708C NetXtreme II GigE (NDIS VBD Client)
#2 does not support teaming.
Please select an adapter with NDIS 6 driver.

In looking at the Device Manager go to the View menu and choose “Show Hidden Devices” and you’ll see two entries for each of the network adapters:

Broadcom BCM5708C NetXtreme II GigE (NDIS VBD Client) #5
Broadcom BCM5708C NetXtreme II GigE (NDIS VBD Client) #5 Teefer2 Miniport

The second Teefer2 Miniport driver is added when Symantec Endpoint Protection (SEP) is installed on the server.  This driver is used for the firewall features in Symantec Endpoint Protection.

In order to get the teaming working again, we uninstalled Symantec Endpoint Protection, then setup the team, then rebooted the server and reinstalled Symantec Endpoint Protection.