Rather than the typical van that drove by we had a horse drawn Rag & Bone Man that came by
Since moving to York in the United Kingdom (since I used to live in the New York area I like to call this York the “original flavored York”) there have been several days when a large van would drive slowly by with a man shouting out the window. From what I could make out he could have been yelling any of the following phrases:
“Fresh Corn!”
“Fresh Manure!” (the van had horse stickers on it and people do like to garden here)
When I asked our neighbour what he was yelling, he didn’t know either.
But yesterday there were several different versions of these guys drove by that I could actually understand what they were saying. The phrase actually was:
“Rag and Bone!”
Turns out that these are Rag-and-Bone men, the scrap collectors of the UK, that drive by to pick up old unwanted items that they can sell for scrap. Typically they are more interested in metal as it has a higher resale value, but will pretty much take anything.
We are in the middle of a migration from Lync 2010 to Lync 2013. The migration has been very smooth and we moved several users over to the Lync 2013 environment for pilot. Shortly after migrating the users, we identified issues with our Dial-In Conferencing. Anyone on Lync 2013 that created a conference could not dial into the conference. Users would call in, be prompted to input the meeting number and then would receive a busy signal. If the user moved back to the Lync 2010 pool, Dial-In Conferencing would work again.
During this process, we didn’t move our SIP trunk from the Lync 2010 Mediation Server at all, so I wasn’t sure why there should be any difference in this case. After running a trace on our Lync 2010 Mediation Server we found the following Messages during a Dial-In Conferencing test hosted by a Lync 2013 user:
Trace from Lync 2010 Mediation Server
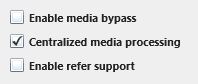
The REFER method error indicated that it wanted to transfer the call from the Lync 2010 Mediation server to itself, which didn’t seem to implicate the new Lync 2013 environment. After checking in with tech support at our SIP trunk provider they reminded us that the REFER method must be turned off for their SIP trunks. In looking at the Lync 2010 Control Panel, the REFER method support is just a check box for “Enable refer support”:
Lync 2010 Control Panel “Enable Refer Support”
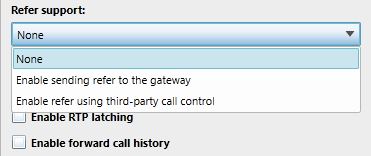
But in Lync 2013 Control Panel this has been moved to a drop down list and this feature hasn’t been duplicated to match the Lync 2010 environment:
Lync 2013 Refer Support
So the default setting in Lync 2013 turns REFER method support back on and sets it to “Enable sending refer to the gateway”.
Just set the Lync 2013 REFER method support to “None” and save the settings to match the Lync 2010 environment. Once the change was made, the Dial-In Conferencing started working again for our Lync 2013 users and the migration could continue.
I recently deployed Microsoft System Center Configuration Manager (SCCM) 2007 R3 for a client on a newly built Windows Server 2008 R2 with SP1.
Everything worked well and I was able to image and deploy applications to the workstations without an issue until trying to deploy an older version of Elite Enterprise. The installation would start, but stay at 0% complete for hours and never actually download. There were no error messages on the client workstation indicating there was a problem.
I had already updated the c:\windows\system32\inetsrv\config\applicationHost.config file to remove references to excluded file extensions under the <requestFiltering> section which has been mentioned elsewhere as causing problems during a BITS transfer.
In digging into the IIS logs further showed some files getting stuck with a 404.8 (Hidden Namespace) error message, again a known issue that has been fixed in the applicationHost.config file by modifying the <hiddenSegments> section of the file. In this case there was a /bin/ directory that was included in the Elite Enterprise installation that was getting stuck.
I also saw the occasional 404.11 (URL Double Escaped) error message in the log that again has been covered elsewhere and fixed in the applicationHost.config file by modifying the <requestFiltering> section of the log.
Eventually I gave up trying to modify the file and went to look in the Internet Information Services (IIS) Manager. By going into the Request Filtering feature under my IIS server (or under the individual Site if you want to be more restrictive) I was able to remove the “bin” segment from Hidden Segments to resolve the 404.8 errors:
And also right click in the empty space in the background of the right pane to choose “Edit Features” and turn on the “Allow double escaping” feature to resolve the 404.11 errors:
Once these changes were made via the GUI I was able to go back to the workstation and quickly deploy the stuck application. So sometimes, when it doubt, go back to the GUI.
Note: This article also posted to my work blog here.
As part of a desktop deployment project it is always a good time to make sure that all workstations have been updated to a consistent BIOS revision level to make sure any problems are not related to BIOS inconsistencies between workstations.
First you need to download the required BIOS update from your hardware vendor and create a normal SCCM Package and Program for it. For most recent Dell hardware the typical command line to deploy the BIOS update silently and without rebooting looks like this for a Dell Latitude E6420 laptop:
“E6420A02.exe” -NOPAUSE -NOREBOOT
Then once the Package and Program are built you can create a new step in your Task Sequence that installs a the Package (just like any other software Package). First, make a folder that limits the new BIOS software to only run on the correct model type using a WMI query (this process is not covered in this post). With the folder limited to a particular model type it isn’t necessary to limit each installation to a particular model type, but only to the particular BIOS version. The folder and package steps should look like this in the Task Sequence:
Once the installation package has been created in the task sequence and named appropriately, click on the Options tab and click the “Add Condition” button and choose “Query WMI”.
Make sure your WMI Namespace is:
root\cimv2
Then paste the following in your WQL Query:
select * from WIN32_BIOS where SMBIOSBIOSVersion < “A02″
This will run this Task Sequence step on all Dell Latitude E6420 laptops (based on the WMI query set at the folder level) that have a BIOS version less than A02, and will skip this step for all computers that have already been upgraded to version A02 or above.
Remember to also add a “Restart Computer” step afterwards to apply the new BIOS to the workstation.
While the above steps will cover any computers that are being reimaged, computers on the floor may still be running older versions of the BIOS. To update the computer BIOS after initial deployment you need to create a new SCCM Collection. Again, I already have Collections created in SCCM that limits by Model type (not covered by this post), so this new Collection is built using the parent collection using the “Limit to collection” setting:
Then under the “Edit Query Statement” click the “Show Query Language” and paste in the following WQL query:
select SMS_R_SYSTEM.ResourceID,SMS_R_SYSTEM.ResourceType,SMS_R_SYSTEM.Name,SMS_R_SYSTEM.SMSUniqueIdentifier,SMS_R_SYSTEM.ResourceDomainORWorkgroup,SMS_R_SYSTEM.Client from SMS_R_System inner join SMS_G_System_PC_BIOS on SMS_G_System_PC_BIOS.ResourceID = SMS_R_System.ResourceId where SMS_G_System_PC_BIOS.SMBIOSBIOSVersion < “A02″
Click OK to get back to the Configuration Manager Console and then go Advertise the BIOS program you previously created to this new Collection. Now only users on a Dell Latitude E6420 without the A02 BIOS installed on their workstation will be able to run this update now, helping to keep all your workstations up to date.
Note: This article also posted to my work blog here.
During a recent troubleshooting session with a Citrix XenApp 5 server, I wanted to make sure that the server included the recommended hotfixes. But when trying to run the downloaded .MSP file the following error was displayed:
Windows Installer Error applying transforms. Verify that the specified transform paths are valid.
Windows Installer Error applying transforms. Verify that the specified transform paths are valid.
This happened over and over with every hotfix downloaded. This server had originally been deployed via System Center Configuration Manager 2007 (SCCM 2007) and I was wondering if the installation cache files had been removed and needed to be downloaded from the distribution point again. The files were correctly in place, but the hotfix wouldn’t run.
Eventually I bypassed the transform file completely by temporarily renaming the “Transforms” value under the following key to “Transforms.old”:
I recently started implementing Microsoft BPOS (Business Productivity Online Suite) to take advantage of the Office Live Meeting accounts for internal use. One of the first steps in the process was to setup the Directory Sync to synchronize our on premise Active Directory domain with the Microsoft Online Services directory. The instructions for that process are very straight forward and easy to follow using the online web pages.
Shortly after the synchronization process started we started to receive the following error messages:
Error 012: Unable to update this object in Microsoft Online Services because the proxy address associated with this object in the local Active Directory is already associated with another object. Fix this in your local Active Directory.
This was happening with a number of the distribution groups associated with our Cisco Unity implementation like unaddressedmessages@kkl.com and unaddressedmessages@kraftkennedy.com. After searching through our domain for identical ProxyAddresses (there weren’t any), it was time to bring Microsoft Online Service Tech Support in to troubleshoot the problem.
A knowledgeable support engineer answered the phone and we started looking into the normal solutions to this problem which have already been covered elsewhere. We eventually narrowed down the problem to the length of the SMTP email addresses. It appears that something in the Directory Sync process only looks at the first 20 characters of an email address (at least for the distribution groups that we were synchronizing). For example, the email addresses were unaddressedmessages@kkl.com and unaddressedmessages@kraftkennedy.com, so both of these email addresses appeared to be identical in the first 20 characters “unaddressedmessages@” as far as Directory Sync is concerned. Not until we turned off the RUS for these email addresses and removed the duplicates in the first 20 characters of the email addresses did the Error 012 error messages go away.
Also during our testing we were seeing some issues with similar duplication in the Display Name as well, so if you are continuing to get Error 012 messages you may also want to make sure the Display Name is unique in the first 20 characters.
Unfortunately the Microsoft Support Engineer wasn’t able to confirm that Directory Sync and BPOS actually worked this way, but hopefully this will help you resolve your own Error 012 messages going forward.
Note: This blog article also posted on my work blog here.
We had a Dell Server with a Broadcom team of NIC’s running Microsoft Windows Server 2008 R2. The motherboard died and was replaced with a new one and got new NIC’s that we needed to add to the team. Every time we tried to add the NIC to the existing team we got the following error message:
[0006] Broadcom BCM5708C NetXtreme II GigE (NDIS VBD Client)
#2 does not support teaming.
Please select an adapter with NDIS 6 driver.
In looking at the Device Manager go to the View menu and choose “Show Hidden Devices” and you’ll see two entries for each of the network adapters:
Broadcom BCM5708C NetXtreme II GigE (NDIS VBD Client) #5
Broadcom BCM5708C NetXtreme II GigE (NDIS VBD Client) #5 Teefer2 Miniport
The second Teefer2 Miniport driver is added when Symantec Endpoint Protection (SEP) is installed on the server. This driver is used for the firewall features in Symantec Endpoint Protection.
In order to get the teaming working again, we uninstalled Symantec Endpoint Protection, then setup the team, then rebooted the server and reinstalled Symantec Endpoint Protection.
I was trying to update the Dell ControlPoint System Manager update from A15 to A16 on my Dell Latitude E6410 laptop today via a package created in SCCM. However, in trying to use the silent installation command:
The installation continued to fail. When running it non-silently I’m getting the following prompt:
—————————
Question
—————————
This will update the System Manager software present on your system. Note: This version will no longer integrate into the Dell ControlPoint launcher. Continue?
—————————
Yes No
—————————
So far I’ve tried the following command line Properties without success based on an .MST capture to compare the MST to the original MSI file:
Eventually I just gave up and used the old standby approach of uninstalling the old version before installing the new version with the following command line:
Ran into an interesting little problem this morning with getting a job to run in the Task Scheduler of a Windows Server 2008 server with Service Pack 2 installed.
Every time I tried to run the job I would get the error message “The directory name is invalid. (0x8007010B)”.
In looking at the Actions for this Task the “Start in (optional)” field was filled in with the correct path name:
“C:\Program Files (x86)\BLAH\”
I thought it might be the trailing backslash problem, so I removed it. Same error message.
Turns out it is the quotes that are causing the problem here as the “Start in (optional)” field just doesn’t support them. Take out the quotes and your task should run just fine. You can set this directory with or without the trailing backslash and it will still work.
Here’s what my corrected Action looks like in the Task Scheduler.
Task Scheduler Job with Corrected "Start In (optional)" field
Last November we joined our next door neighbors on a lovely trip to Brazil. We saw lots of interesting places, met lots of interesting people, ate lots of interesting foods. One food in particular fascinated me, the cashew. For most Americans the cashew is just a nut (like a walnut or almond) and we don’t think too much about where they come from or what they look like. My grandparents used to always have a bowl of shelled nuts and a nutcracker that you had to use to break the shells, so I had a pretty good idea of what a walnut and almond looked like in their natural habitat. Not so with cashews. In Brazil cashews are primarily a fruit (usually consumed as a juice) and only sold as an afterthought to tourists on the beach as the roasted nut that we know in the States.
The fruits themselves are very unusual, so it was great to see them in the local market and understand how they grow. First the nut part appears on the tree (see the cashew nut shaped object on each fruit below), then the fruit grows after it. Very different than your regular apple, pear, or peach.
Fresh Cashews at the Market
Our host family usually had cashew juice for breakfast every day which I enjoyed. The flavor is a little difficult to describe, but think of combining a lime and orange and a mango together and you are getting close. They even brought a cashew home from the market so I could try the fruit directly. We brought it back to our apartment and it sat in the refrigerator for several days.
On the day before we were to leave Brazil, I decided to try and eat the fruit. It tasted pretty much like the juice, with a slightly mushy pulp. The juice of the cashew squeezes out of the pulp so you are just left with a flavorless glob of pulp that you spit out. Not too bad. Now I had this nice little cashew nut shaped shell in my hand, I wondered if there might be a nut inside. There is only one way to find out. First I tried using a knife from the kitchen, but as I worked at the leathery slippery skin I was worried that the knife would slip and I might cut myself. So why not just bite it open? Okay.
I stuck the nut in the corner of my mouth to get a good grip on it and bit down. Hmmmm, that tastes very odd. Wow that tastes really bad! A bitter taste spreads through the side of my mouth. My teeth and inside of my cheek become sticky. The corner of my lips start burning. I ran to get some water to try and stop the burning and it didn’t work. Next stop, the Internet!
The seed is surrounded by a double shell containing an allergenic phenolic resin, anacardic acid, a potent skin irritant chemically related to the more well known allergenic oil urushiol which is also a toxin found in the related poison ivy. Some people are allergic to cashew nuts, but cashews are a less frequent allergen than nuts or peanuts.
GREAT! So basically I’ve just been chewing on the equivalent of poison ivy or poison oak. Time to break out the big guns and start treating this like a poison ivy infection. First I brushed my teeth with toothpaste. Sort of helped. Next I literally washed my mouth out with soap. Bar soap didn’t work so well, dishwashing soap was better. More water and more spitting later seemed to resolve most of the pain.
Then back to the Internet to find out what you are supposed to do if this happens. Interestingly, they don’t say very much about this. Do I go to the hospital? Am I going to have a major allergic reaction on our flight back from Brazil? We called up our host family and they just laughed and said you aren’t supposed to do that, and started to tell all their friends about what the silly American did with the cashew fruit.
That night the corner of my mouth just stung, but it was bearable, the flight back to the U.S. was okay, but things went downhill from there. First my belly started itching, then my butt, then my arms, legs and under my neck. I never really broke out in the usual poison ivy type sores, but everything was itchy. Seven days after the incident I woke up and couldn’t see out of my right eye. Nothing itchy, but just all completely puffed up. This went on for a few more days before things started getting back to normal and most of the itchiness was gone in about a month.
Day 7 After Biting Cashew Nut Shell
So it turns out the one reason you never see raw cashew nuts (in or out of the shell) anywhere is that the nuts are surrounded by a nice little poison. The pickers of cashew fruit are often affected by this oil, but that’s usually about it. All cashew nuts that are sold are actually roasted to deactivate the toxin in the shells which is why you never see true “raw” cashew nuts for sale.
So next time you are eating unusual fruits that you know the fruit is edible and the nut is edible, stop for a second and check the Internet to see if some other part of the fruit might be poisonous. You have been warned.


